
Running, Scheduling, and Automating Agents
Agents don’t just create content — they can run, repeat, and refresh themselves automatically.
This guide walks you through everything: how to manually run an Agent, how to automate it, how scheduling works, and how to keep it running smoothly over time.
1. The Three Tabs: History, Output, and Schedule
Every Agent in Ongage Studio comes with three key tabs along the top right of its dashboard:
| Tab | Purpose |
|---|---|
| History | A complete record of all past runs — including timestamps, inputs, and outputs. Use this to track changes, performance, and version history. |
| Output | Shows the latest generated result. If the Agent creates text, this is your final article or post. |
| Schedule | The automation center. From here, you can set the Agent to run automatically at defined intervals — daily, weekly, monthly, or even hourly. |
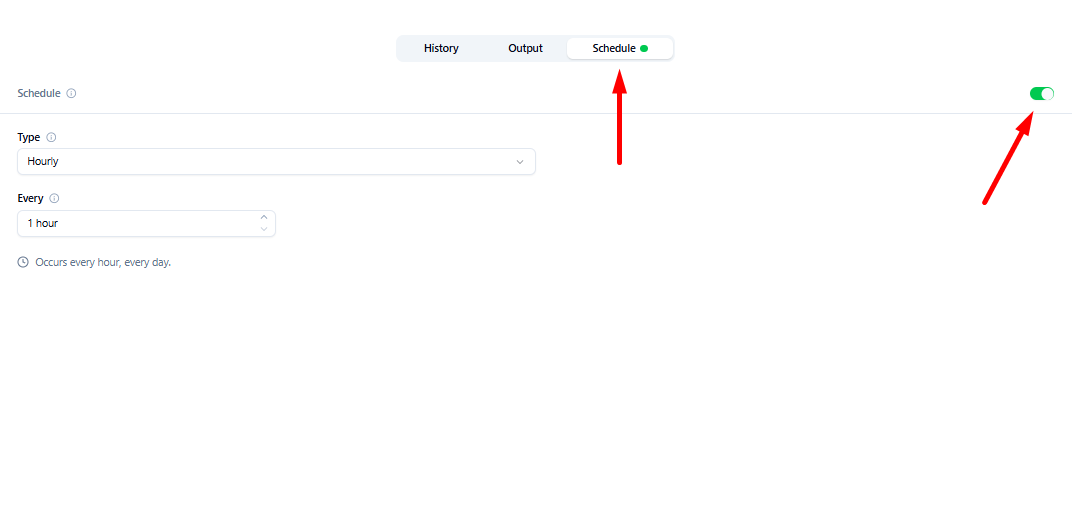
2. Enabling the Schedule
To start automating:
- Click the Schedule tab.
- On the top right, toggle the automation switch (the pill icon) to the ON position.
- Once enabled, the scheduling panel will expand — showing all available frequency types and time controls.
You can disable or re-enable scheduling at any time without losing your saved preferences.
💡 Tip: When scheduling is turned off, the Agent won’t run automatically — but all your settings remain saved for when you turn it back on.
3. Schedule Types and Options
Ongage Studio supports five frequency types. Each one controls how often and when your Agent runs automatically.
| Type | Best For | Available Options |
|---|---|---|
| Hourly | Agents that monitor frequently changing data (e.g., breaking news feeds, stock tickers). | Choose the interval (e.g., every 1 hour, every 3 hours). |
| Daily | Regular newsletters, blog updates, or content feeds. | Choose how many days apart (1–6) and set a specific time of day. |
| Weekly | Scheduled campaigns or recurring series. | Select the days of the week and the time. |
| Monthly | Reports, roundups, or recurring publication cycles. | Choose the day of the month and time. |
| Annually | Yearly campaigns, brand anniversaries, or seasonal content. | Choose the date and time of year. |
4. Example Configurations
Below are examples using the Ongage Studio Scheduler interface — just like you’ll see in the platform.
Hourly

- Type: Hourly
- Every: 1 hour
- Result: “Occurs every hour, every day.”
Use this for continuous monitoring or fast-refreshing Data Streams.
Daily
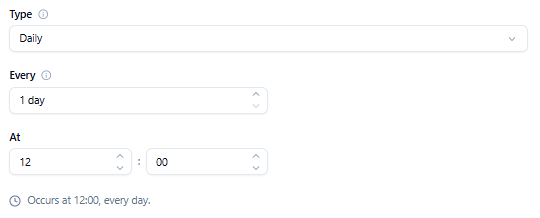
- Type: Daily
- Every: 4 days
- At: 12:00
Result: “Occurs at 12:00, every 4 days.”
Ideal for regular content publishing or newsletter automation.
Weekly
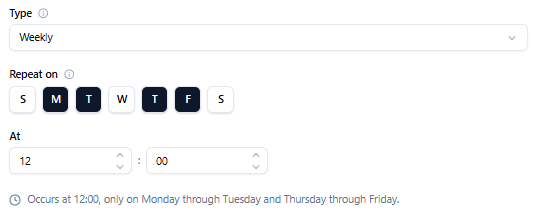
- Type: Weekly
- Repeat on: Monday, Tuesday, Wednesday, Friday, Saturday
- At: 12:00
Result: “Occurs at 12:00, only on Monday through Wednesday and Friday through Saturday.”
Perfect for structured content calendars or campaign sequences.
Monthly
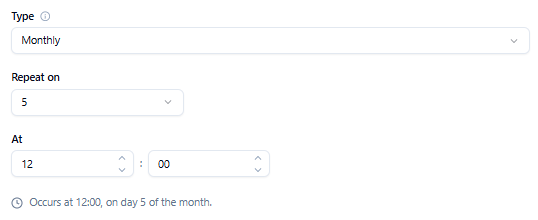
- Type: Monthly
- Repeat on: Day 3
- At: 12:00
Result: “Occurs at 12:00, on day 3 of the month.”
Use for monthly reports, client updates, or automated digests.
Annually
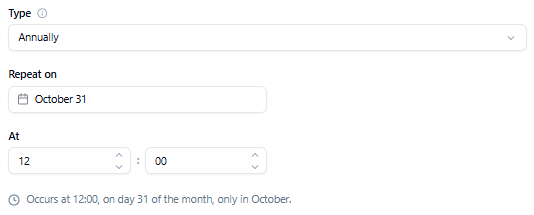
- Type: Annually
- Repeat on: October 21
- At: 12:00
Result: “Occurs at 12:00, on day 21 of the month, only in October.”
Ideal for once-a-year campaigns, retrospectives, or milestone events.
5. Why Scheduling Is Powerful
Scheduling is especially useful when your Agent is connected to a Data Stream — a living feed of curated content that automatically updates as new items are published online.
With scheduling, your Agent can automatically pull the latest Data Stream items, write new articles, and publish or export them without any manual input.
Example workflow
- Create a Data Stream that tracks “Tech & Innovation.”
- Connect it to your Blog Post Article Generator Agent.
- Set the schedule to run daily at 9:00 AM.
- The Agent automatically writes a new tech article each morning — always using the most recent data.
The result: you build your editorial system once, and it keeps running forever.
6. Managing Scheduled Agents
Scheduling gives you flexibility and full control:
- Run manually anytime: You can still press “Run” even if automation is enabled.
- Pause automation: Toggle the switch off — the setup stays saved.
- View History: Track when runs occurred, how long they took, and whether they succeeded.
- Review Output: The latest results always appear under the Output tab.
- Edit safely: Updating your inputs or configuration won’t break your schedule — the next run will use the new settings automatically.
7. Best Practices for Automation
Here’s how to get the best results from automated Agents:
✅ Pair with a Data Stream.
The more dynamic your data, the more valuable the automation.
✅ Match frequency to freshness.
If your Data Stream only updates weekly, hourly scheduling adds no benefit.
✅ Lock in your Brand Voice.
Automation uses your saved voice and guidelines exactly as configured.
✅ Test before you schedule.
Always run manually once to confirm output quality.
✅ Monitor early runs.
Review the first few outputs in the History tab to ensure formatting, tone, and timing are correct.
✅ Space out schedules.
If you have multiple Agents drawing from the same Data Stream, schedule them at staggered times to avoid overlap.
8. Manual Runs Still Work
Even with automation active, you can click “Run” at any time to trigger a new generation manually.
This doesn’t interfere with your schedule — it simply adds another entry to your History log.
Manual runs are ideal for:
- Quick content updates.
- Testing new Brand Voices or settings.
- Reviewing format or prompt edits before next automation cycle.
9. Troubleshooting & Common Issues
Even the best automation needs occasional checks. Here’s how to diagnose and fix common scheduling problems.
Agent Didn’t Run at Scheduled Time
Possible causes:
- Schedule toggle is off.
- Agent was edited and not re-saved.
- Data Stream temporarily failed to load or returned no items.
Fix:
- Confirm the Schedule toggle is on.
- Verify the schedule type and time are valid.
- Check the History tab — if no entry appears, the run didn’t trigger.
- If the Agent is linked to a Data Stream, open the Data Stream page to confirm it contains items.
Agent Shows “No Data Found” or Empty Output
Possible causes:
- The connected Data Stream returned zero results at run time.
- Filters or exclusions in the Data Stream are too strict.
Fix:
- Open the Data Stream.
- Temporarily loosen filters to confirm that content is flowing.
- Run the Agent manually to test.
- Adjust the update frequency if needed.
Duplicate or Overlapping Runs
Possible causes:
- Multiple Agents using the same Data Stream and schedule.
- Two schedules overlapping (e.g., Daily + Hourly).
Fix:
- Stagger your run times (e.g., 9:00 AM, 10:00 AM, 11:00 AM).
- Keep only one schedule per Data Stream-Agent pair.
Data Stream Deleted or Renamed
- If a linked Data Stream is deleted or renamed, the Agent cannot fetch its input.
Fix:
- Reconnect the Agent to a new or existing Data Stream via Select Input Source.
- Run manually once to verify.
Agent Modified Mid-Schedule
If you edit your Agent (prompt, structure, or settings) while it’s scheduled, the next run will automatically use the new version. There’s no need to reset the schedule.
🧠 Tip: After major prompt or brand changes, perform one manual run to preview the new tone before it goes live on automation.
Schedule Still Active but You Want to Pause
Simply switch the toggle OFF.
The schedule remains saved, but no automatic runs will occur until you turn it back on.
Notifications or Output Missing
If an automated run completes but you don’t see an output:
- Check the History tab for confirmation of completion.
- Verify your filters in any connected export or publishing Agent.
- Confirm the Agent has permission to write to its designated output (e.g., site, document, or API).
10. Summary
Scheduling is what transforms Ongage Studio from a content creation tool into a self-operating editorial engine.
Once configured, your Agents will:
- Pull fresh data from your Data Streams.
- Write and refine new content in your Brand Voice.
- Deliver consistent, timely, and hands-free results.
You set the rhythm.
Ongage Studio keeps the beat.
Create once. Configure once. Let it run forever.